Off-grid solcellssystem. I Nordiskt klimat! by Bosse
Webbsidan är senast uppdaterad:
Arduino C/C++ kodning
Arduino, ESP32, FreeRTOS C/C++ - kodexempel, funktioner & IDE för kodning
Webbsidan skapad 2021-12-09
Samlar här lite speciella C/C++ funktioner och kodexempel för kodning / programmering av Arduino Uno och ESP32 i Arduino IDE och i VSCode-PlatformIO.
How to convert flash char array to String in Arduino Uno?
One can use a cast to __FlashStringHelper to invoke the right constructor of the String class. It is the constructor which copies the char array from PROGMEM. __FlashStringHelper is intended as return type for the F() macro.
		const char charArray[] PROGMEM = "Some text";

		void setup() {

		  Serial.begin(115200);

		  String s((const __FlashStringHelper*) charArray);

		  Serial.println(s);

		}

		void loop() {

		}
Convert character array to string in Arduino:
		void setup() {

		// put your setup code here, to run once:

		  Serial.begin(9600);

		  Serial.println();

		  char buf[10] = "Hello!";

		  Serial.print("Char array: ");

		  Serial.println(buf);

		  String s = String(buf);

		  Serial.print("String: ");

		  Serial.println(s);

		}

		void loop() {

		// put your main code here, to run repeatedly:

		}
Using PROGMEM with sprintf_P, to use sprintf_P with both format string and arguments stored in PROGMEM in Arduino Uno.
Here´s the correct syntax:
		char header_1[] PROGMEM = "Dissolved O2";

		char buffer[100];

		void setup() {

		   Serial.begin(57600);

		   sprintf_P(buffer,PSTR( "The column header is %S") ,header_1);

		   Serial.println(buffer);

		}

		void loop(){}
Note that the %S has a capital S because header_1 is in PROGMEM.
void print(int x, int y=4){ // error: redefinition of default argument
std::cout << "x: " << x << '\n';
std::cout << "y: " << y << '\n';
}
Arduino Tutorial: Avoiding the Overflow Issue When Using millis() and micros()
The millis() number will overflow / rollover (go back to zero) after 49 days and 17 hours.
It´s an unsigned long with a maximum value of 4294967295.
Se även 64bit timer (rollover after 292.5 years).
Rollover safe coding:
		int period = 1000;

		unsigned long time_now = 0;

		void setup() {

		}

		void loop() {

		  if(millis() - time_now > period){

		    time_now = millis();

		    Your code...;

		  }

		}
Med aningen bättre precision med bara en millis():
		int period = 1000;

		unsigned long lastTime = 0;

		void setup() {

		}

		void loop() {

		  unsigned long now = millis();

		  if ((now - lastTime) >= period) {

		    lastTime = now;

		    Serial.printlnf("%lu", now);

		  }

		}
		WiFi.begin(ssid, password);

		while(WiFi.status() != WL_CONNECTED){

		  Serial.print(".");

		  delay(500);

		}

		configTime(0, 0, "pool.ntp.org"); // is a cluster of timeservers for anyones use

		setenv("TZ", "CET-1CEST,M3.5.0,M10.5.0/3", 1); // Stockholm timezone String

		tzset(); // N.B. setenv() & tzset() must be set after each watchdog timer reboot

		WiFi.disconnect(true);

		WiFi.mode(WIFI_OFF);
ESP32 Time Library Sync Interval
An application with this initialization code [configTime() called in the setup loop syncs time with NTP server, getLocalTime() function reads the internally kept Time.] will periodically synchronize the time. The time synchronization period is determined by CONFIG_LWIP_SNTP_UPDATE_DELAY (default value is one hour). To modify the variable, set CONFIG_LWIP_SNTP_UPDATE_DELAY in project configuration.
Getting Date & Time From NTP Server With ESP32, Last Minute Engineers
Once the ESP32 is connected to the network, we use the configTime() function to initialize the NTP client and obtain the date and time from the NTP server.
The getLocalTime() function sends a request packet to an NTP server, parses the time stamp packet received, and stores the date and time information in a time structure, struct tm.
The Daylight Saving Time flag (tm_isdst) is greater than zero if Daylight Saving Time is in effect, zero if Daylight Saving Time is not in effect, and less than zero if the information is not available.
* tm_sec is generally 0-59. The extra range is to accommodate for leap seconds in certain systems. ESP32 getLocalTime(), struct tm code example
RTC till unix Epoch-time: time_t EpochTime;
time(&EpochTime);
New book by Espressif on ESP32-C3, more than 400 pages, for free! ESP32-C3 Wireless Adventure, A Comprehensive Guide to IoT
- Practice of IoT Projects
- ESP RainMaker, a complete AIoT platform
- Development Environment
- ESP32-C3
- WiFi & Bluetooth
- Local Control
- Cloud Control
- Smartphone App Development
- Optimisation & Security
- ESP Insights Monitoring
- etc.
Se även ESPHome
How to use FreeRTOS with Arduino – Real-time operating system, Microcontrollerslab
This is a getting started tutorial on FreeRTOS using Arduino. To demonstrate examples and use of various features of the FreeRTOS operating system, we will use Arduino Uno board and Arduino IDE for writing programs. But you can also use other development boards such as ESP32 and ESP8266.
Espressif ESP32 FreeRTOS, Espressif
This section contains documentation of FreeRTOS types, functions, and macros. It is automatically generated from FreeRTOS header files.
RTOS: Mutex and Semaphore Basics, Open4Tech - As embedded system designers, it is our job to identify the critical sections of the program and use mutexes to protect them.
Mutex vs Semaphore, A Mutex is different than a semaphore as it is a locking mechanism while a semaphore is a signalling mechanism. A binary semaphore can be used as a Mutex but a Mutex can never be used as a semaphore. The Mutex is a locking mechanism that makes sure only one thread (task) can acquire the Mutex at a time and enter the critical section. This thread only releases the Mutex when it exits the critical section.
At Inter-Task communication via Queue messages by xQueueReceive() controlling the Task execution, one can get a similar function as vTaskDelayUntil() via the xTicksToWait in xQueueReceive() by calculating a new xTicksToWait for an absolute until time just before the code-row with the xQueueReceive().
It will give the combined function of xQueueReceive() and vTaskDelayUntil()!
"Direct To Task Notifications" för effektivare kod: "Unblocking an RTOS task with a direct notification is 45% faster and uses less RAM than unblocking a task with a binary semaphore."
Perfekt där man har en Task som exekverar regelbundet helt asynkront men man ibland behöver exekvera / unblock synkront från annan Task eller programfunktion.
			In Task_LCDbuttonsHandler():

			TickType_t xLastWakeTime = xTaskGetTickCount();

			const TickType_t xFrequency = 250 / portTICK_PERIOD_MS;

			TickType_t xTicksToWait;

			while (true)

			{

			 if ((xTaskGetTickCount() - xLastWakeTime) < xFrequency)

			 {

			  xTicksToWait = xFrequency - (xTaskGetTickCount() - xLastWakeTime);

			 }

			 else

			 {

			  xTicksToWait = 1;

			 }

			 ulTaskNotifyTake(pdTRUE, xTicksToWait); // Unblocks each 250ms

			 xLastWakeTime = xTaskGetTickCount();

			 [...]

			}

			In StateHandler():

			xTaskNotifyGive(TaskLCDbuttonsHandler); // Unblocks Task_LCDbuttonsHandler()
ESP32 Inter-Processor Call (IPC), ESP32 inter-processor communication
Har tänkt att float- och int-variabler accessas inom en klockcykel så ingen risk för kollision där, men kan ju bli det när en global sådan variabel accessas samtidigt från de två olika CPU-kärnorna! Så ett lite feltänk pga oerfaren inom Multitasking- / Mulitecore-kodande!
Access till globala variabler kan ge konflikt om man inte skapar exklusiv access via Semaphore-Mutex.
Samt om risk för race-condition ge exklusiv access till globala double-variabler (s.k. none-atomic variables) då de tar två klockcykler att accessa, samt troligen samma till alla class-object instanser (eller bara dess funktioner()?) i FreeRTOS Multitasking-koddrift!
Interrupt Allocation - Overviewesp_intr_alloc():
- Allocating an external interrupt will always allocate it on the core that does the allocation.
- Freeing an external interrupt must always happen on the same core it was allocated on.
- Esp_intr_disable() and esp_intr_enable() external interrupts from another core is allowed.
Care should be taken when calling esp_intr_alloc() from a task which is not pinned to a core. During task switching, these tasks can migrate between cores. Therefore it is impossible to tell which CPU the interrupt is allocated on, which makes it difficult to free the interrupt handle and may also cause debugging difficulties. It is advised to use xTaskCreatePinnedToCore() with a specific CoreID argument to create tasks that allocate interrupts. In the case of internal interrupt sources, this is required.
Conclusion: call the esp_intr_alloc() from within the Deferred interrupt processing Task to get it pinned to the same core as the Task.
When using Espressif Arduino Framework in PlatformIO / VSCode, Bing Copilot says:
"The interrupt itself is not directly pinned to a specific core. By default, the ESP32 handles interrupts on whichever core is available. However, you can influence which core handles the interrupt by creating a task pinned to a specific core and processing the interrupt within that task.
ISR Execution: The ISR (Interrupt Service Routine) will be executed on the core that is currently available when the interrupt occurs. You cannot directly pin the ISR to a specific core.
Task Handling: To ensure that the processing of the interrupt is handled on a specific core, you create a FreeRTOS task pinned to that core. This task can then handle the interrupt processing." I.e. Deferred interrupt processing.
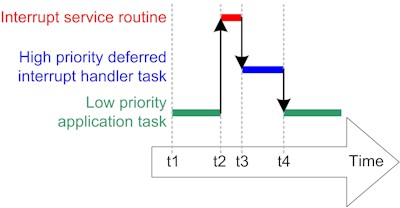
FreeRTOS Binary Semaphore – Examples of Tasks Interrupt Synchronization using Arduino, Microcontrollerslab Deferred interrupt processing Deferred interrupt processing execution sequence when the deferred handling task has a high priority.It can be used to unblock a task each time a particular interrupt occurs effectively synchronizing the task with the interrupt. This allows the majority of the interrupt event processing to be implemented within the synchronized task with only a very fast and short portion remaining directly in the interrupt service routine. This is also known as deferred interrupts processing. Deferred interrupt processing will typically involve recording the reason for the interrupt and clearing the interrupt within the ISR, but then unblocking an RTOS task so the processing necessitated by the interrupt can be performed by the unblocked task, rather than within the ISR.
If the task to which interrupt processing is deferred is assigned a high enough priority then the ISR will return directly to the unblocked task (the interrupt will interrupt one task, but then return to a different task), resulting in all the processing necessitated by the interrupt being performed contiguously in time (without a gap), just as if all the processing had been performed in the ISR itself. Deferred interrupt context switch:xQueueSendTobackFromISR() will set *pxHigherPriorityTaskWoken to pdTRUE if sending to the queue caused a task to unblock, and the unblocked task, "the Deferred interrupt process", has a priority higher than the currently running task. If xQueueSendToBackFromISR() sets this value to pdTRUE then a context switch should be requested before the interrupt is exited. This context switch request is done by a call to portYIELD_FROM_ISR() / taskYIELD_FROM_ISR() (which are the same) at the end of the ISR and is executed after the ISR is closed.
Otherwise will the interrupted Task continue to execute after finished ISR and the context switch to the higher priority Deferred Task happens first at the next Time Slicing tick interrupt of the Preemptive multitasking scheduler, which with the fix 1ms time slice ticks in ESP32 FreeRTOS will cause a random delay of ≤1ms.
This random delay of ≤1ms was very visiable measured by a digital memory oscilloscope in my batterymonitor project, where with the use of portYIELD_FROM_ISR() / taskYIELD_FROM_ISR() the context switch via ISR gets a good real-time function with extremely small variation in the 25µs Deferred ISR Interrupt Latency, ESP32 Interrup ISR → Deferred Task interrupt processing latency! A direct contex switch from ISR to an unblocked Deferred Task! An extreme difference from without Yield() given ≤1ms latency!
To not risk a context switch inside the small ISR by another interrupt one could enclose it in portENTER_CRITICAL_ISR(&Mux) / portEXIT_CRITICAL_ISR(&Mux), which blocks all other interrupts. source1, sourc2, sourc3, sourc4, atomic instruction, FreeRTOS Kernel Control
N.B.: FreeRTOS API functions must not be called from within a critical section!
void IRAM_ATTR ISR_deferred(void)

{

  portENTER_CRITICAL_ISR(&Mux); // Do not use here!

  int64_t InterruptTime;

  BaseType_t HigherPriorityTaskWoken = pdFALSE;

  InterruptTime = esp_timer_get_time();

  xQueueSendToBackFromISR(DeferredInterruptQueue, &InterruptTime, &HigherPriorityTaskWoken);

  if( HigherPriorityTaskWoken )

  {

    portYIELD_FROM_ISR();

  }

  portEXIT_CRITICAL_ISR(&Mux); // Do not use here!

}
But inside a portENTER_CRITICAL() / portENTER_CRITICAL_ISR(): FreeRTOS API functions must not be called from within a critical section, which means that in the above ISR() should not portENTER_CRITICAL_ISR(&Mux) be used! DuckDuckGo: "Deferred interrupt processing"
FreeRTOS: Queues, Inter-task communication and synchronisation FreeRTOS: Queue Management Modules, all functions / API FreeRTOS: Queue Set API Functions ESP32 Arduino: FreeRTOS Queues, techtutorialsx
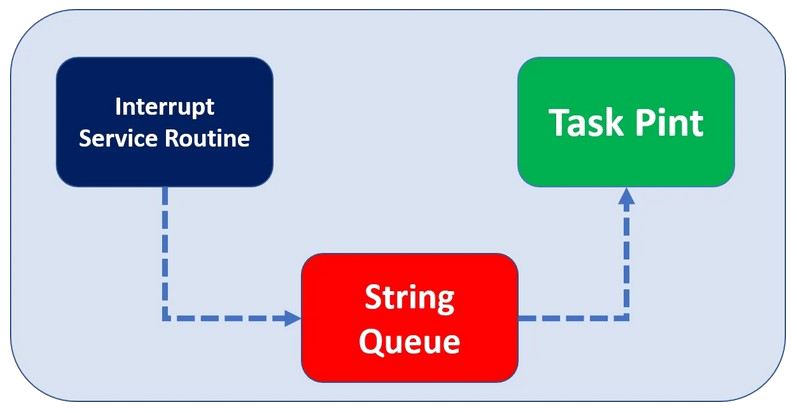
Queues are the primary form of intertask communications. They can be used to send messages between tasks, and between interrupts and tasks. Deferred interrupt processing with QueueIn most cases they are used as thread safe FIFO (First In First Out) buffers with new data being sent to the back of the queue, although data can also be sent to the front. Deferred interrupts processing II: In your abstraction layer for the esp32 you can create a task that waits on some queue. In the interrupt routine [ISR] only post to the queue and return. The task you created then will wake up and call the callback. källa FreeRTOS Interrupt Management Examples with Arduino, Deferred Interrupt with Queue.
FreeRTOS Interrupt Management Examples with Arduino, Microcontrollerslab
FreeRTOS interrupt provides an interrupt safe version of queue API to read and write data from queues using ISR. These are the two API functions: xQueueSendToBackFromISR(), xQueueReceiveFromISR().
ESP32 High Resolution Timer, int64_t esp_timer_get_time() returns 64-bit time since startup, in microseconds (µs). int64 = 292,5 years before overflow at µs resolution! The millis() overlows after 49,7days!
Unlike gettimeofday function, values returned by esp_timer_get_time() start from zero after startup or the chip wakes up from deep sleep and do not have timezone or DST adjustments applied.
The millis() can be called in an ISR but it doesn´t increment inside it but gives the time for the interrupt. The esp_timer_get_time() can also be called in an ISR, and do probably not increment either.
Interrupt allocation, Docs Espressif
Care should be taken when allocating an interrupt using a task not pinned to a certain core; while running code not in a critical secion, these tasks can migrate between cores at any moment, possibly making an interrupt operation fail because of the reasons mentioned above. It is advised to always use xTaskCreatePinnedToCore with a specific CoreID argument to create tasks that will handle interrupts.
- Allocating an external interrupt will always allocate it on the core that does the allocation.
- Freeing an external interrupt must always happen on the same core it was allocated on.
- Disabling and enabling external interrupts from another core is allowed.
- ISR can´t be migrated between cores, so they´re defacto ´pinned´ to a core. The core is the one that installs the interrupt.
- Functions called by a Task runs on the same core as the task.
The ESP32 has two cores, with 32 interrupts each. Each interrupt has a certain priority level, most (but not all) interrupts are connected to the interrupt mux.
Because there are more interrupt sources than interrupts, sometimes it makes sense to share an interrupt in multiple drivers.
Multicore issues - IRAM-Safe Interrupt Handlers - Multiple Handlers Sharing A Source
FreeRTOS Binary Semaphores [Inter-task communication and synchronisation], freertos.org
Binary semaphores and mutexes are very similar but have some subtle differences: Mutexes include a priority inheritance mechanism, binary semaphores do not. This makes binary semaphores the better choice for implementing synchronisation (between tasks or between tasks and an interrupt), and mutexes the better choice for implementing simple mutual exclusion.
ESP32 Arduino: Getting DHT22 sensor measurements with interrupts, techtutorialsx
In terms of implementation, our code will periodically read measurements from the DHT22 sensor. Nonetheless, instead of relying on polling or Arduino delays, we will use the timer interrupts to implement the periodicity of the measurements.
attachInterrupt( ) - modes ONLOW_WE & ONHIGH_WE, how do they work?
So ONLOW_WE maps to GPIO_INTR_LOW_LEVEL: "input low level trigger" with wakeup enabled (WE), and ONHIGH_WE to GPIO_INTR_HIGH_LEVEL: "input high level trigger" with wakeup enabled. There is also ONLOW and ONHIGH, that is without wakeup.
So, in simple words, ONLOW_WE will trigger an interrupt if the input signal level is low (not a falling edge) and wake up the ESP32 from light sleep, if it is currently in light sleep. Espressif Interrupts
Espressif: GPIO wakeup (light sleep only)
Tillsammans med Interrupt på samma GPIO:
			pinMode(19, INPUT_PULLUP);

			gpio_wakeup_enable(GPIO_NUM_19, GPIO_INTR_LOW_LEVEL);

			esp_sleep_enable_gpio_wakeup();

			attachInterrupt(digitalPinToInterrupt(19), ISR_INA226Batt, ONLOW_WE);
I min ISR växlar jag till FALLING-interrupt samt sätter en ISRFlag=false så den bara kan anropa dess deferred interrupt handler en gång. Sedan återställer jag till ONLOW_WE-interrupt i deferred interrupt handler samt sätter ISRFlag=true. På så sätt får jag en flanktriggnings liknande funktion som FALLING trots ONLOW_WE. Tänker även prova med att bara sätta ONLOW_WE-interrupt precis innan ESP32 sätts i light-sleep där.
I början av ISR:
			attachInterrupt(19, ISR, FALLING);

			static int64_t InterruptTime = esp_timer_get_time();

			if(ISRFlag)

			{

			  ISRFlag = false;

			  // Flag (boolean) cleared here and set in DeferredInterrupt-Task

			  xQueueSendToBackFromISR(DeferredInterruptQueue, &InterruptTime, NULL);

			}
Sist i DeferredInterruptTask:
				attachInterrupt(19, ISR, ONLOW_WE);

				ISRFlag = true;
ESP32 Pinout – How to use GPIO pins?
				Some GPIO pins are used to configure bootloader or flashing mode of ESP32 during application flashing or bootloading.

				GPIO0

				GPIO2

				GPIO4

				GPIO5 (must be HIGH during boot)

				GPIO12 (must be LOW during boot)

				GPIO15 (must be HIGH during boot)
Comparing the speeds of different GPIO Read/Write methods, code
ESP32 GPIO 22:
			GPIO.out_w1ts = ((uint32_t)1 << 22); set 1

			GPIO.out_w1tc = ((uint32_t)1 << 22); set 0

			and

			REG_WRITE(GPIO_OUT_W1TS_REG, BIT22); set 1

			REG_WRITE(GPIO_OUT_W1TC_REG, BIT22); set 0

			are equally fast with 100ns per 1-0-1 output.


			Read value from GPIO:

			value = (GPIO.in >> 22) & 0x1;

			value = (REG_READ(GPIO_IN_REG) & 22);

			are equally fast with 50ns per intput.
The ESP32 PWM hardware has 16 different channels, not pins. You can assign any of these channels to any GPIO pin that you want. But it has to have an output driver or in other words, it should be capable of operating as an output pin.
The ESP32 PWM controller has 8 high-speed channels and 8 low-speed channels, which gives us a total of 16 channels. They´re divided into two groups depending on the speed. For each group, there are 4 timers / 8 channels. This means every two channels share the same timer. Therefore, we can´t independently control the PWM frequency of each couple of channels.
So this means we´ve got 16 channels that we can control their PWM duty cycle independently. But the frequency has to be shared between each couple of channels routed to the same timer. ESP32 PWM Tutorial & Examples
ESP32 Change CPU Speed / clock frequency:2022-06-27
My be fixed frequency intervalls, 240, 160, 80, 40, 20 & 10MHz för ESP32 with 40MHz XTAL crystal frequency, getXtalFrequencyMhz() / getCpuFrequencyMhz() / setCpuFrequencyMhz(10) / getApbFrequency(): ESP32 Change CPU Speed (in Arduino).
N.B. 40MHz, 20MHz & 10MHz only usable in case you are not using Wi-Fi or Bluetooth?!
"The only preferable values entered are 240, 160, and 80MHz, but you can also use lesser values, i.e., 40, 20 and 10MHz, in case you are not using Wi-Fi or Bluetooth [PWM?]." The normally 80MHz ApbFrequency is also changed with CPU-frequency as it goes <80MHz - does it influence the PWM bit depth vs max frequency above?
TinyML Book, TinyML Machine Learning with TensorFlow Lite on Arduino and Ultra-Low-Power Microcontrollers - hos Amazon.se
Introduction to TinyMLIntroduction to TinyML - hos Amazon.se, köpte denna
"This book is an effort by AI Technology & Systems to demystify the TinyML technology including market, applications, algorithms, tools and technology. The book dive deeper into the technology beyond common application and keep it light for the readers with varying background including students, hobbyists, managers, market researchers and developers. It starts with introduction to TinyML with benefits and scalability."
Med bl.a. kapitel om: Predictive Maintenance Solution Interface, Sensors and Analyses, Industry 4.0 Applications, TinyML and Predictive Maintenance, Sensors and Interface, Sensor Data and Equipment State, etc
Känns som jag ska kunna få en bra uppfattning om TinyML kan göra nytta för PWM-regulator + Batterimonitor!
TensorFlowLite_ESP32, PlatformIO library
"Allows you to run machine learning models locally on your ESP32 device. This library runs TensorFlow machine learning models on microcontrollers, allowing you to build AI/ML applications powered by deep learning and neural networks."
Pushing Updates to the Web Page with HTML5 Server-Sent Events (php)HTML5 Server-Sent Events (SSE)
OBS! Både enheten man surfar från och ESP32´s webbserver måste vara uppkopplade mot samma WiFi-nätverka för att det ska fungera. Råkade ut för det när jag testade att datorn / mobilen var uppkopplad mot lägenhetens WiFi-nätverk och ESP32 webbservern mot WiFi-nätverket från Teltonika RUT241 4G-routern och det fungerar inte, naturligtvis!
ESP How To Write a Wi-Fi Application, It is not a MUST, but it is strongly recommended that you take some time to read this article first, especially if you want to program a robust Wi-Fi application, Espressif
ESP32 corrupt heap when handling multiple simultaneous requests, Websockets has been updated / fixed, but SSE (which has similarities with websockets) not. As stated I use Server Sent Events so possible an issue still exists in SSE. (2018, ESPAsyncWebServer)
Så med ESPAsyncWebServer verkar WebSockets stabilare, samt kan då även fixa inställningsvärden till ESP32 typ Batterikapacitet (Ah) samt reset, etc.
XESP32 Web Server (WebSocket) with Multiple Sliders, The communication between the clients and the ESP32 is done using WebSocket protocol. Additionally, whenever there´s a slider change from one client, all clients update their slider values simultaneously.
JavaScript typed arrays, Mozilla. JavaScript typed arrays are array-like objects that provide a mechanism for reading and writing raw binary data in memory buffers. Array objects grow and shrink dynamically and can have any JavaScript value. JavaScript engines perform optimizations so that these arrays are fast. However, as web applications become more and more powerful, adding features such as audio and video manipulation, access to raw data using WebSockets, and so forth, it has become clear that there are times when it would be helpful for JavaScript code to be able to quickly and easily manipulate raw binary data. This is where typed arrays come in.
PlatformIO: AsyncMqttClient ESP32, This release makes the client more bulletproof than ever. Simply put: right now, even if you do a loop to publish messages at a very fast rate, the client will not break and will not loose functionality (ACKs will still be sent, etc.).
Protocol Buffers (Protobuf):
is a free and open-source cross-platform data format used to serialize structured data. It is useful in developing programs to communicate with each other over a network or for storing data.
nanopb, Nanopb is a plain-C implementation of Google´s Protocol Buffers data format. It is targeted at 32 bit microcontrollers, but is also fit for other embedded systems with tight (<10 kB ROM, <1 kB RAM) memory constraints. Finns för ESP32 i PlatformIO.
Embedded Proto, Embedded Proto is an easy to use C++ Protocol Buffer implementation specifically suited for microcontrollers.
LVGL: Open-source, fully available on GitHub, used by many developers, and trusted by industry leading companies.
Kan kombineras med openHASP, Control your home-automation devices from a customizable touchscreen UI connected via MQTT via an ESP32.
Popular Created by 300+ developers, used by 100,000+ people and downloaded in every minute. LVGL is available in Arduino, PlatformIO, ESP32, MCUXpresso, Zephyr, NuttX, RT-Thread, ARM CMSIS-Pack and many more.
Cross-platform Has no external dependencies and can be compiled for any vendor´s any MCU or MPU, and (RT)OS to drive ePaper, OLED or TFT displays, or even monitors.
Lightweight Needs only 32kB RAM, 128kB Flash, a frame buffer, and at least an 1/10 screen sized buffer for rendering.
Bindings LVGL is written in C (C++ compatible) and has bindings to MicroPython, PikaScript, JavaScript (React-like) and Berry.
image2cpp, a simple tool to change images into byte arrays (or your array back into an image) for use with Arduino and (monochrome) displays such as OLEDs. It was originally made to work with the Adafruit OLED library.
PlatformIO IDE i VSCode för Arduino och ESP32 kodning / utveckling:
PlatformIO, 800+ Boards, 35+ Development Platforms, 20+ Frameworks, C/C++
PlatformIO IDE for VSCode, beskriver installation & grundläggande användning
Quick Start: This tutorial introduces you to the basics of PlatformIO IDE workflow and a general understanding of how to work with projects in the IDE.
PlatformIO (pio) device serial monitor - Filters, where time adds a timestamp with milliseconds for each new line, applied in the Project Configuration File platformio.ini: monitor_filters = time
I PlatformIO i platformio.ini gör följande tillägg att man får tillgång till Arduino-ESP32 3.x med den nya vassare WiFi-stacken och kan enkelt testa med en fork av sitt projekt:
platform_packages = framework-arduinoespressif32 @ https://github.com/espressif/arduino-esp32.git#3.0.0
platform_packages = framework-arduinoespressif32 @ https://github.com/espressif/arduino-esp32.git#3.3.1 - bra val
platform_packages = framework-arduinoespressif32 @ https://github.com/espressif/arduino-esp32.git#3.3.6
Men funktionen med Arduino 3.x.x i PlatformIO verkar tveksam: You are trying to compile your PlatformIO project using arduino-espressif32 Version 3.x as the framework but get errors, Techoverflow, samt WiFi-event API ändrat, FreeRTOS-API-ändringar etc. så nog inget bra för befintligt projekt Listade aktuella versioner, verified = bra Arduino Release v3.3.6 based on ESP-IDF v5.5.2
Alla dessa lib_deps fungerar med 3.3.x:
- wollewald/INA226_WE@^1.2.4
- ottowinter/ESPAsyncWebServer-esphome@^3.4.0
- bblanchon/ArduinoJson@^7.0.2
- adafruit/Adafruit INA260 Library @ ^1.5.2
- robtillaart/DS18B20@^0.2.3
I pioarduino kan man använda C++20 som ger stöd för:
- std::span
- std::format
- std::string_view
- std::ranges
- constexpr - förbättringar
- concepts
- std::chrono - utökningar
- std::atomic_ref - bättre atomics för FreeRTOS
Via: build_flags = -std=gnu++20 i platformio.ini
Espressif´s ESP32-C5 is the industry´s first RISC-V SoC solution that supports 2.4 and 5 GHz dual-band Wi-Fi 6, along with Bluetooth LE. - (blog post)
Espressif´s ESP32-S3: An AI SoC built specifically for the AIoT market. It combines 2.4 GHz Wi-Fi 4 and Bluetooth 5 (LE) with powerful AI acceleration and reliable security features for high-performance applications of voice and face recognition.
Espressif: "This guide helps manufacturers of wireless-enabled products based on Espressif modules understand the RED DA (EN 18031) cybersecurity requirements, identify their product´s category, and determine the right path to certification before launching in the EU market." RED DA (EN 18031) Certification Compliance: What You Need to Know
PlatformIO (pio) device serial monitor - Filters, where time adds a timestamp with milliseconds for each new line, applied in the Project Configuration File platformio.ini: monitor_filters = time
I PlatformIO bibliotekshanterare sök på respektive:
framework:espidf
framework:arduino
Signal K, marine data exchange:
Signal K is a modern and open data format for marine use. Built on standard web technologies including JSON, WebSockets and HTTP, Signal K provides a method for sharing information in a way that is friendly to WiFi, cellphones, tablets and the Internet.
Kan det kanske även vara något inom off-grid solcellssystem?
MQTT - The Standard for IoT Messaging:
MQTT is an OASIS standard messaging protocol for the Internet of Things (IoT). It is designed as an extremely lightweight publish / subscribe messaging transport that is ideal for connecting remote devices with a small code footprint and minimal network bandwidth. MQTT today is used in a wide variety of industries, such as automotive, manufacturing, telecommunications, oil and gas, etc.
PlatformIO: AsyncMqttClient ESP32, This release makes the client more bulletproof than ever. Simply put: right now, even if you do a loop to publish messages at a very fast rate, the client will not break and will not loose functionality (ACKs will still be sent, etc.).
InfluxDB - Time Series Data Platform:
Time series engine: Get any data – metrics, events, logs, traces – from everywhere – systems, sensors, queues, databases and networks – and store in a high-performing engine capable of ingesting millions of data points per second. InfluxDB includes a massive community & ecosystem of cloud and open source developers to help you work the way you want to. You need to work with tools that make your apps shine and fit the way you work.
The Industrial IoT solution using InfluxDB provides real-time insight and analytics into manufacturing processes — collecting, storing and visualizing data from sensors, devices, and industrial equipment. InfluxDB is Open Source.
ESPHome / Home Assistant - Home Automation systems:
ESPHome is a system to control your ESP8266 / ESP32 by simple yet powerful configuration files and control them remotely through Home Automation systems.
Verkar vara en vanlig kombination med ESPHome och Home Assistant, även inom off-grid!
WireGuard - fast and modern VPN:
Blev tipsad om WireGuard för säker kommunikation till min webbsida från ESP32 via Internet, men är osäker på om det går när inhyrd på webbhotell som min webbplats är?
Min ursprungliga tanke är att skicka krypterad loggdata över https:// och tror nog ändå det blir tillräckligt säkert med de bra säkerhetsfunktionerna i RUT241 routern. Ska även skicka data glest från 1ggr/h till 1ggr/dygn adaptivt styrt och däremellan är RUT241 avstängd.
WireGuard® is an extremely simple yet fast and modern VPN that utilizes state-of-the-art cryptography. It aims to be faster, simpler, leaner, and more useful than IPsec, while avoiding the massive headache. It intends to be considerably more performant than OpenVPN. WireGuard is designed as a general purpose VPN for running on embedded interfaces and super computers alike, fit for many different circumstances. Initially released for the Linux kernel, it is now cross-platform (Windows, macOS, BSD, iOS, Android) and widely deployable. It is currently under heavy development, but already it might be regarded as the most secure, easiest to use, and simplest VPN solution in the industry. Wireguard client library for connecting ESP32 to a VPN server. The WireGuard client library can be used to connect an ESP32 to a WireGuard server, enabling network tunneling and secure communication over possibly insecure transport. Another use case is exposing services running on an ESP32 that is connected through (several) layers of NAT, as is often the case when using mobile network. Note that this requires server-side setup as well.
Filtrering av signaler för undetryckande av störningar Noise reduction:
Simplifiead Moving Average (like a RC-filtering): MovAverageLevel = MovAverageLevel + (NewLevelRead - MovAverageLevel) / 100;
Or more compact C++ code: MovAverageLevel += (NewLevelRead - MovAverageLevel) / 100;
If these erroneous readings are like very short spikes, you can make a kind of simplified moving average, where you always just take and add like 1/10, 1/100 or whatever fits of the difference between the current average and the current measurement.
Depends on how often you sample how much to include, but with 1/100 you suppress such an incorrect reading 100 times.
The more correct way to get rid of random peaks (outliers), is to make use of the Nalimov statistical model: Nalimov statistical model / Nalimov test Nalimov test
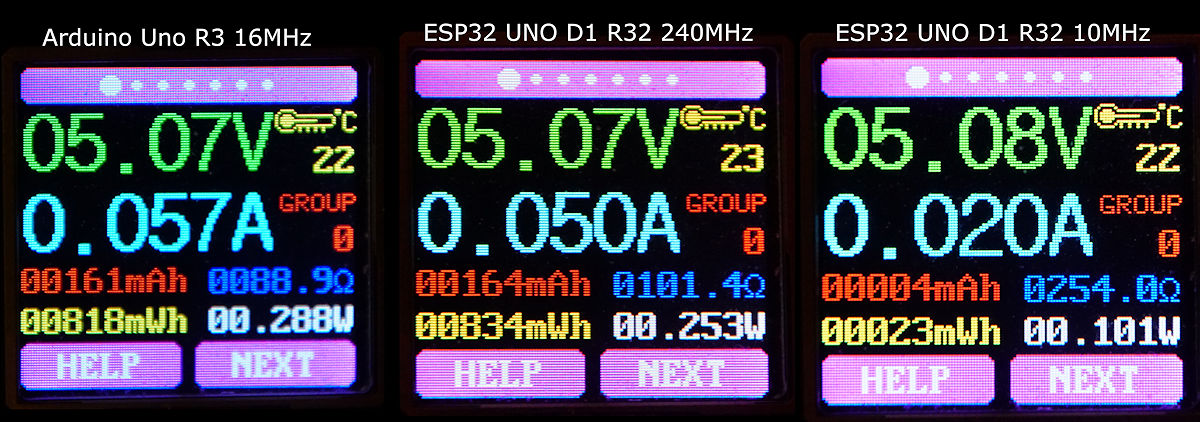
Gjorde några precision strömmätningar för Arduino Uno R3 och ESP32 UNO D1 R32 med exakt samma sketch kompilerad i båda och med samma Olimex Shield-LCD 16x2 på båda.
Med släckt bakgrundsbelysning blev det då:
- Arduino Uno R3 16MHz: 57mA
- ESP32 UNO D1 R32 240MHz: 50mA
- ESP32 UNO D1 R32 10MHz: 20mA
Och med tänd bakgrundsbelysning 33% intensitet +8mA mer.
Strömmatade via USB under mätningarna.
Så trots så extremt mycket mer prestanda är ESP32 strömsnålare, samt har flexibiliteten att man kan anpassa dess klockfrekvens dynamiskt i drift till ens behov för att kunna få strömsnålare drift när det passar.
För riktigt strömsnål ESP32-drift i deep-sleep: Did you set all unused pins as outputs? If pins are left floating as inputs, that can draw current internally. Yes that that was the reason. After resetting the pins that are connected to the DIP switch before going to deep sleep, my deep sleep current is now 12.7µA (233µA before).